Contact List Management
>How to save my excel file into .CSV?
Your import file must be in comma-separated values format
(or CSV for short) to reduce the chances of errors occurring during import. If
you have your list of email addresses saved as a Microsoft Excel spreadsheet
then it's easy to convert that file to a .CSV file. Here's how
To save an Excel file as a .CSV file.
1) Open Excel and open the file containing your contact
list.
2) On the Excel toolbar, select File > Save As. A dialog
box pops up.
3) Type a new name for the file in the File Name text field.
4) In the "Save as Type" drop-down menu, scroll
down to locate and select CSV (comma delimited).
5) Click Save.
a) If you see a message that the file type doesn't
support multiple worksheets, click OK
b) If you get a message "file may contain
features that may not be compatible file type", click Yes to continue.
6) Close the file and exit from Excel.
>How to import contacts from a file?
If you already have a list of contacts in a file on your
computer, you can upload that file into the system and add the contacts to your
new contact list. To start, you will need to export your contact list from your
other mailing program. You should export your contact list into a CSV (comma
separated value) file. A CSV file will contain a list of your contacts details
in a line-by-line format, such as:
user1@site,MALE,Y,20030101
user2@site,FEMALE,N,20031014
user3@site,MALE,N,20020706
Move your mouse over the "Lists" tab and click the
"Import Contacts" option in the left, as shown below:
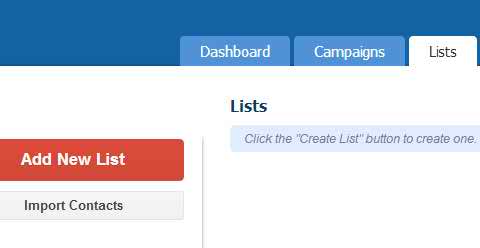
This will start the "Import Contacts" wizard.
Choose the contact list you want to import contacts to and click the "Next
>>" button.
The example import file above includes three records, and
each record is separated with a new line. Each record contains four fields, and
each field is separated with a comma. The CSV file will typically have a .CSV
or .TXT file extension. Start by clicking on the "Browse…" button
in the form to select your CSV file from your hard drive:

To import contacts from a file, click the
"Browse…" button to choose the file.
If your import file contains a line of headers like this:
EMAIL,SEX,EMPLOYED,DATE
user1@site,MALE,Y,20030101
user2@site,FEMALE,N,20031014
user3@site,MALE,N,20020706…
… make sure you tick the "Yes, this file contains
headers" checkbox. Click the "Next >>" button to proceed
to the next step.
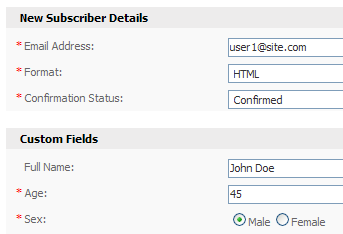
You will now be asked to map the fields from the imported
file to the fields in the system. Simply click the dropdown box next to each
field that was found in the file and match it up to the field in the system.
Here's an example for an import file that included "Sex" and
"Age" custom fields:
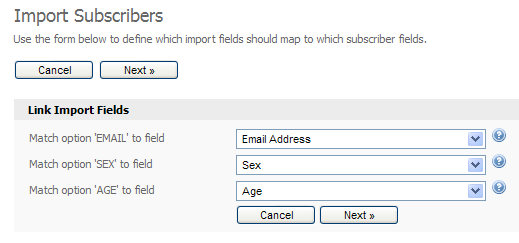
Click the dropdown next to each imported field to map it to
the appropriate field in the system.
Click the "Next >>" button when you are
done. Finally, click the "Start Import" button. Your contacts will be
imported one by one and the popup window that appears will show you how many
contacts have been imported and how many remain. You will see a final report
when all contacts have been imported:
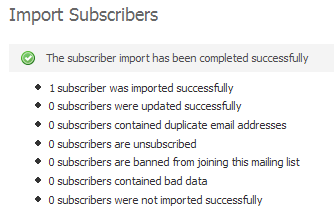
The final screen will tell you how many contacts were
imported. It will also tell you if your contact file contained bad data.
>What are custom fields and why/how would I use them?
Custom Fields or Mail Merge Fields are used by you to
personalise your emails to your customers. You can also use these fields to
filter your sends so that only particular contacts receive the email depending
on the details that they have saved for themselves.
How do I create custom fields?
The first step in using custom fields is to have a contact
list created. When you have created this contact list you can then go to the
menu option 'Contact List' and select 'View Custom Field' from there.
This will bring you to a page for viewing, editing and
creating any custom fields you have already created or are planning on
creating. Here you will need to select the 'Create a Custom Field' button.
This will start you through the creation process. You will
have to select the type of custom field you want and name it so that you can
use it in your Email Campaigns and Autoresponders. If you select to make the
field 'Mandatory' your users will not be able to complete the form without
entering these details.
The types of custom fields are:
·
Text Field – Use this to gather small amounts of information
about your contacts. This could be their First Name or Last Name etc. You can
then use this custom field to personalise your emails by opening with something
such as 'Dear %%First Name%%'.
·
Multiline Text Field – This type of custom field is good for
gathering larger amounts of data from your contacts such as having them send
you comments on your products or service. (If you set the website form you
create to 'Emulate a contact form' you will be sent an email with these
comments when any user fills out the form).
·
Numbers Only – Using this type of custom field can be good for
gathering information such as phone numbers.
·
Dropdown List – This type of custom field allows your user to
select only one option from a predefined list of options. You could use this to
ask for your users title such as Mr, Mrs or Miss.
·
Check Box – Check boxes allow your users to select multiple
options. You could use this to request information on what your users favorite
things are such as their favorite style of music. This will then allow you to
filter your email sends to only those users that have selected Rock and those
that have selected Jazz rather then sending irrelevant information to those
users that do not like these genres.
·
Radio Button – You can use this in just the same fashion as the
dropdown list but have it set out differently in your form. It will still only
allow your contact to select one option from a predefined list.
·
Date Field – Using a date field will allow you to gather
information such as Birthdays of your users.
When you have selected your type of custom field and named
it you can move onto the next step. This step will have options such as
'Default Value', 'Field Length', 'Start Date' and so on. The most important of
these is the Default Value. You can use this so that if your contact does not
enter a value but you still wish to use this custom field in your email
campaigns you do not have to worry about emails looking strange.
If you send an email that states 'Dear %%First Name%%,' and
your user has supplied the name John you will send an email that reads 'Dear
John,'. If you have set a Default value of 'Friend' and your contact does not
save his/her name your email will then read 'Dear Friend,' rather then 'Dear
,'.
Viewing and editing your custom fields
To view what details are stored in your contacts custom
fields you have 2 options. The first is to export your contact list and view
the list of contacts as a CSV (Comma Separated Values) file. To do this you
simply have to select 'Contacts->Export Contacts to a File' from the menu.
When you do this you will be given the option to select which contact list you
wish to export and which custom fields associated with that contact list to
include in this export.
The second option is to view the list of contacts through
the 'Contacts->View Contacts' menu. When you have found the contact that you
wish to view/edit the details of simply select the 'Edit' link next to their
email address and you will be shown the information that that particular
contact has saved on themselves.
If this method of editing contact information is too slow
then you can either import the contact list again with updated information,
choosing to update the current information to the imported file, or you can
send a 'Modify Details Form' to your contacts.
Using your Custom Fields in your Email Campaigns and
Autoresponders
When you create your email campaigns and autoresponders you
will see an option, in the WYSIWYG editor, below the WYSIWYG editor and below
the text box for text based email content, that reads 'Insert Custom Field'.
When you select this option you will be presented with a pop up window that
contains a list of all the built in custom fields and then a listing of all the
user created custom fields listed by contact list.
When you decide which custom field that you wish to insert
into your email campaign, click the insert link and it will be placed where the
cursor was located.
This will look similar to %%Custom Field Name%% when you
insert this into your email campaign. When you send your email to your contact
list any details that they have saved for those custom fields will be inserted
into the email in replacement of the %%Custom Field Name%%
Remember that sending a test email campaign will not replace
the custom fields. Your emails will still come through with the custom field
place holders to show what your email would look like.
Another thing that you should make sure to remember is that
custom fields are associated with contact lists. This means that if you send an
email to a contact list that the custom fields are not associated with they
will not be replaced and your email will not look correct. Be sure to use
custom fields for the mailing list that you intend to send it to.
>Can GetBulkMail automatically add an Unsubscribe link
if one isn't included?
Yes, GetBulkMail can be configured to automatically add an
unsubscribe link to every email campaign and autoresponder if it detects that
one isn't available.
>Is there a way to send a single newsletter to
separate contact lists without generating duplicates if individuals are members
of both lists?
Yes there is. When you are sending your email campaign and
are selecting the contact lists that you wish to send to you can simply hold
down the 'CTRL' key and select multiple lists.
GetBulkMail will only send the email once to each user no
matter how many lists they are subscribed to
>How to find unsubscribed contacts
To view the unsubscribed contacts:
Go to Contacts -> Search Contacts in the menu,
Choose "View specific contacts from within the selected
lists below",
Select the list you want and click Next, and
Choose the Activity Status "Unsubscribed" and
click Next.
You should now be presented with all of the unsubscribed
contacts of the lists you selected. You can click 'Edit' for a contact and set
their Activity Status to "Active" again.
There is no way to set the Activity Status of contacts en
masse. Generally there is a very good reason why a contact is labelled as
unsubscribed or bounced, and changing this manually could result in your server
being blacklisted.
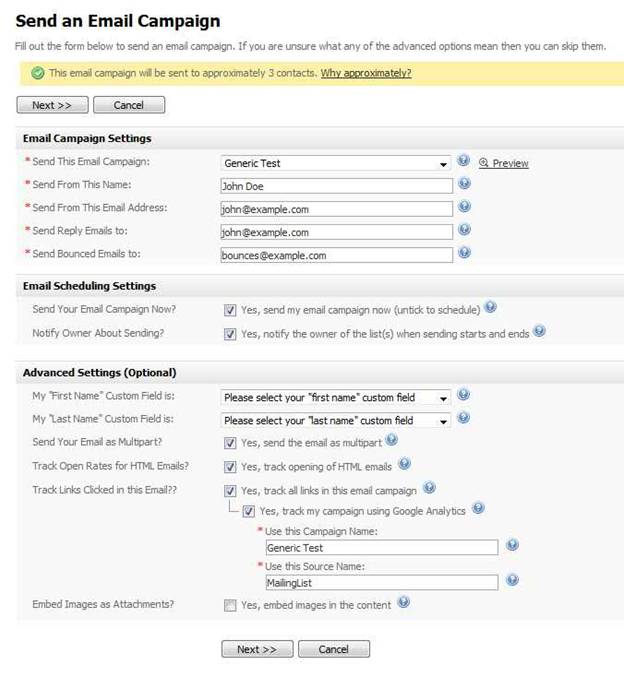
>Sending Emails Based on Subscriber Segmenting
Sending and segmenting the campaign
Click the "Send an Email Campaign" option under
the "Email Campaigns" tab at the top of the system. Choose the
mailing list you want to send to, and make sure you tick the "Yes, show
filtering options on the next page" option as this is where we will
segment the list.
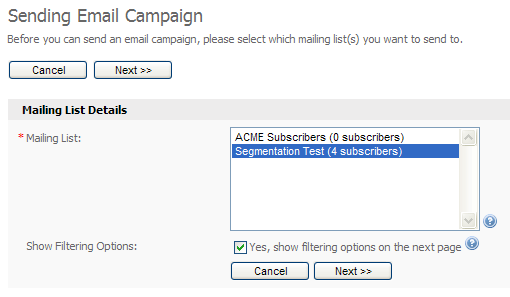
The first step of segmenting and then sending our email
campaign.
On the next step we can segment and filter our mailing list,
telling the system to only send to subscribers who match certain details. In
our example we only want to send to males over 21, so we fill out the custom
field filtering options. You can use powerful filtering options on number
fields as you can see below.
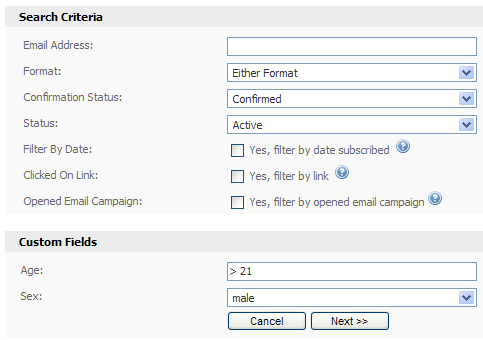
Segmenting our subscriber list using filter options.
We have chosen to only send to males over 21. The ">
21" text in the age field takes care of the age segmenting for us
automatically. Click the "Next >>" button to continue and
complete the rest of the sending steps as normal. The email will only be sent
to male subscribers over the age of 21.
>How do I view a list of all Unsubscribed email
accounts?
To view a list of all unsubscribed users you simply select
'Contacts->Search Contacts' from the drop down menu in GetBulkMail.
Once you have done this you need to select the option
'Specific contacts from within the selected lists below' and either select a
specific contact list to see the unsubscribed email accounts for a particular
contact list or '–All Lists–' to view them from all contact lists.
The next page will then give you some filtering options. You
need to change the 'Status' from 'Active' to 'Unsubscribed' and click 'Next'.
will then show you a list of all unsubscribed email accounts
from the list/s that you selected.
>How to create a contact list?
A list is a collection of your contacts details. It includes
their email address and any optional fields such as Name, Age and Sex which you
can create. When sending out an email newsletter, you send it to a list which
means everyone on that list will receive the email.
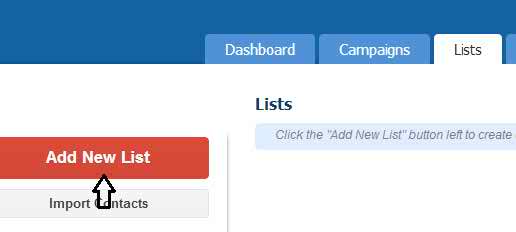
To create a list, click the "Add New List" option
appear left side under lists page.
Note: You can have multiple list.
>I am trying to import a contact list into GetBulkMail
and am receiving errors when I know the data is correct. What could be causing
this?
One of the most common reasons for your contact lists being
rejected by GetBulkMail as having bad data is because of trailing space
characters on your emails.
GetBulkMail does not know what you want to do with this and
treats it as a bad email.
Simply remove these trailing spaces and you will be able to
import your list.
>How to export active/bounced/unsubscribed contacts to
a file
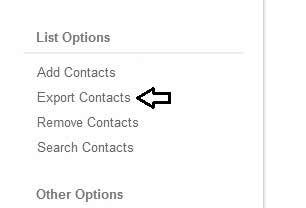
To export contacts to a file, Go to list page and click
"Exports Contacts" appear in the left side as shown below
Then tick yes, I would like to filter the contacts from the
selected list(s). as shown below and click next to continue
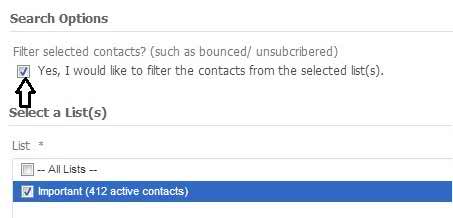
Select status "Active" to export all active
contacts to a file. Select "Bounced" or "Unsubscribed" to
export bounced or unsubscribed contacts respectively. Select "Any
Status" to export all contacts in the list including active, bounced and
unsubscribed.

Then click next and select CSV
file format to export contacts to a comma delimated file. Finally click next to
start the export.
>How can I easily change my
contacts from Text to HTML?
You can do this easier from the
'View Contact List' option.
Check the box next to the contact
list that you wish to change and then select the option from the drop down menu
above to 'Change to HTML'.
This will change the whole list
for you.
>How do I re activate a contact that has already been
unsubscribed?
To re activate unsubscribed users simply follow these steps.
– Click the menu item 'Contacts->Search Contacts'
– Select the radio option 'Specific contacts from within
the selected lists below'
– Either select '–All Lists–' to show all unsubscribed
people or select the contact list that you are after for a more refined list.
Click Next
– On the filtering options page select
'Status->Unsubscribed'
– Select Next.
That will take you to a page that will display all the
unsubscribed email addresses for your contact list.
To resubscribe them simply select the 'Edit' option
corresponding to their email address and change the 'Status' to 'Active'.
>Is it possible to resend an email to a contact list
but only to the contacts that have joined after I sent it first?
Yes you can. Here's what you do:
1. Select the newsletter and send it as normal.
2. You can then use the "Filter" option and
"Filter by date subscribed" This will give you a date field that you
can select.
3. You select the date that you want to filter by, so it
would be something like: Contacts that have subscribed after 20 Oct 2007.
4. Send the newsletter as per normal. It will only be sent
to those that have subscribed after a particular date.
This will only send the emails to people who have subscribed
after you have sent the email the first time.
>How do I view a list of all Unsubscribed email
accounts?
To view a list of all unsubscribed users you simply select
'Contacts->View Contacts' from the drop down menu in GetBulkMail.
Once you have done this you need to select the option
'Specific contacts from within the selected lists below' and either select a
specific contact list to see the unsubscribed email accounts for a particular
contact list or '–All Lists–' to view them from all contact lists.
The next page will then give you some filtering options. You
need to change the 'Status' from 'Active' to 'Unsubscribed' and click 'Next'.
This will then show you a list of all unsubscribed email
accounts from the list/s that you selected.
>Can GetBulkMail send one email to multiple lists?
Yes. GetBulkMail can send your email to multiple/all lists
at once. It also takes care of making sure duplicate copies of the email are
not sent to the same person if they are subscribed to multiple lists.
When prompted to select your contact list, simply hold down
the CTRL key and select the lists you wish to send to.
>Adding contacts to list one by one?
If you only have a handful of contacts to add to your list,
you can use the "Add Contacts" form to add them in manually.
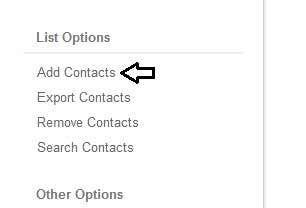
To add contacts by typing them in, click the "Add a
Contacts" option appear left side under the lists page.
Choose a list to add contacts to and click the "Next
>>" button. Fill out the form by typing in their email address and
values for any custom fields you've created for the contact list.
Complete the form to add a contact to the selected contact
list.
When you're done, click "Save" to save the contact
to the contact list and add another contact. Clic "Save And Exit" to
add the contact and return to the main page of the system.
>I am trying to import a contact list into GetBulkMail
but keep getting errors stating that the file could not be loaded.
This generally happens because you are trying to import a
large CSV file. You can break your import file up into smaller parts and just
import more files.
>Can I make multiple copies of my contact lists?
Yes and No. GetBulkMail will allow you to make multiple
copies of a contact list using the Copy function under Contact Lists –>
View Contact Lists. Unfortunately, this feature will only carry over custom
field associations and other details, but will NOT copy over subscriber data.
The proper way to transfer subscriber data across multiple
contact lists is by using the Import/Export from File functions. By default,
export will only move active subscribers, so if you also want unsubscribed/bounced
subscriber data to carry across to your new list, ensure you use the
"Search for contacts to export from my contact list" option, and set
Activity Status to "Any".
>If I send the one email to multiple contact lists and
someone unsubscribe, what contact list are they removed from?
They are unsubscribed from all contact lists.
>How to export opened / unopened contacts to a file
To export opened / unopened contacts to a file, Go to list
page and click "Exports Contacts" appear in the left side as shown below
Then tick yes, I would like to filter the contacts from the
selected list(s). as shown below and click next to continue.
'Tick' Yes, filter by opened email campaign and select the
campaign from the drop down as shown below.
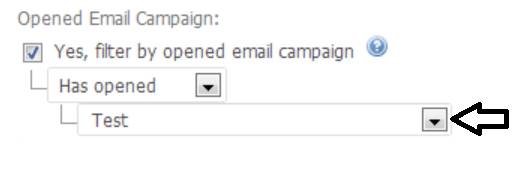
'Active' to 'Any Status'
Then click next and select CSV file format to export
contacts to a comma delimated file. Finally click next to start the export.
What is a suppression list?
A suppression list is a list that contains email addresses
that you wish to permanently exclude from future emails you send using our
service.
>How to supress contacts/domain?
1. Click the lists tab
2. On the left side menu click Suppression list
3. Click Supress Email/ Domain
4. Enter the list of email addresses to supress in the text
box as mentioned below image. Seperate each address with a new line. If you
would like to supress whole domain, simple enter @domainame. For example to
suppress every one at Hotmail, enter @hotmail
5. Click save to finish.
>How are unsubscribes handled in GetBulkMail? Are they
deleted or marked as Inactive?
GetBulkMail marks any unsubscribes as inactive, but does not
delete them from your database. This way, if you re-import or add the same
contact, they are not re-subscribed accidentally.
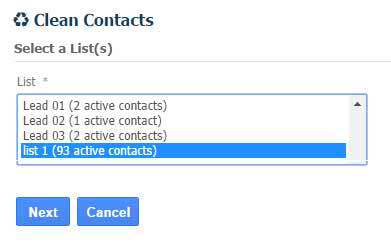
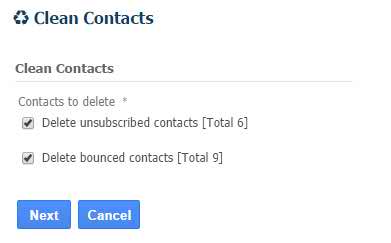
>Delete bounced / unsubscribed contacts from a list
Go to list – Click 'Clean Contacts' option from left side
menu.
To permanently delete Unsubscribed and or Bounced contacts
from your list, start by choosing a list below and click next.